


Table of contents
- Introduction
- Getting Started with Rust
- Understanding Rust Data Types
- Functions
- Understanding Ownership and Scoping
- Ownership and Functions
- References to Data Without Ownership
- Borrowing, Modifying Data Without Ownership
- Defining and Using Structs
- Implementing Methods on Structs
- Introduction to Anchor
- Writing the program
- Understanding the Anchor Code Structure
- Defining the Hero Account
- The Concept of Rent on Solana
- Calculating Rent
- Account Size Calculation
- Implementing the Total Size
- Understanding the CreateHero Struct
- The Role of CreateHero
- Function Definition
- Function Logic
- Importance
- The UpdateHero Account
- Fields
- The UpdateHero Function
- Function Body
- Deploying the program
- Testing the program
- Key Points
- Conclusion
Introduction
In our in-depth tutorial series where we explore the journey of building on Solana, starting from the very basics of Rust programming to the intricacies of Solana development. Solana stands out in the blockchain space for its incredible speed and efficiency, making it an exciting platform for developers. Our journey will take us from understanding Rust, a powerful language that forms the backbone of Solana development, to creating our first Solana program using Anchor, a framework designed to make Solana development easier and more intuitive.
This article is based on the Build On Solana full tutorial series covered on youtube.
Rust for Blockchain Development
Rust is a multi-paradigm programming language known for its safety and performance. It's the foundation upon which Solana's lightning-fast blockchain is built. Before diving into Solana, getting comfortable with Rust is crucial.
Rust's ownership model, safety guarantees, and concurrency management make it an ideal language for blockchain development.
Due to it's powerful way of managing memory and fast execution, it is a common tool in many blockchains like Solana, Polkadot, Near and many more.
Getting Started with Rust
Rust, is the powerful and efficient programming language that underpins the Solana blockchain. Rust is known for its emphasis on speed, memory safety, and concurrency, making it an ideal choice for developing high-performance blockchain applications.
To get started, you'll need to install Rust on your computer. This is a straightforward process that begins by visiting the official Rust website. There, you'll find the installation instructions that are specific to your operating system, be it Windows, macOS, or Linux. The website guides you through each step of the installation process, ensuring you have Rust ready to go on your system without any guesswork.
However, if you're keen on diving straight into Rust without the initial setup on your local machine, the Rust Playground offers an excellent alternative. It's a browser-based tool that allows you to write, compile, and run Rust code directly from your web browser. The Rust Playground is accessible from anywhere at any time, making it incredibly convenient for those who wish to experiment with Rust code, debug existing projects, or simply explore the language's features.
Throughout this tutorial series, we will make extensive use of the Rust Playground. This approach not only simplifies the learning process but also allows you to engage with the content actively, trying out code samples and seeing the results instantly, all without the need for a local development environment.
The Rust Playground represents an ideal solution for beginners or anyone looking for a quick and easy way to experiment with Rust. It eliminates the barriers to entry, enabling you to focus fully on learning the language and exploring its potential in blockchain development.
In this section of our Solana development series, we delve into the fundamentals of Rust, starting with an essential building block: data types. Rust's type system is both rich and expressive, allowing developers to write safe and efficient code. Here, we explore various data types through a practical code snippet that illustrates their usage in Rust.
Understanding Rust Data Types
Rust enforces type safety to ensure that operations are performed on compatible types, thereby reducing errors and enhancing code reliability. Let's break down some of the code snippets to understand the various data types and their nuances.
Numeric Types
Rust offers several numeric types, but here we focus on integers and floating-point numbers:
let x: i8 = 5;
let y: f64 = 3.5;
In this example, x is an 8-bit integer with a value of 5, while y is a 64-bit floating-point number with a value of 3.5. Rust's numeric type annotations allow us to specify the size and nature (integer or floating-point) of our numeric data precisely.
Attempting to perform an operation on x and y without type conversion results in a compile-time error due to type mismatch. However, we can resolve this by explicitly converting x to a f64:
let z_soln = x as f64 - y;
Booleans
Booleans in Rust are straightforward, represented by true or false:
let is_tall = true;
Variables in Rust are immutable by default, meaning once a value is assigned, it cannot be changed. This immutability is a core part of Rust's approach to safety and concurrency. To modify the value of a boolean (or any variable), we must explicitly declare it as mutable:
let mut is_tall = true;
is_tall = false;
Characters and Strings
Rust distinguishes between characters and strings. Characters are single Unicode scalars denoted by single quotes:
let my_char = 'A';
Strings, or more precisely, string slices (&str), are sequences of characters enclosed in double quotes. They are immutable references to a sequence of UTF-8 encoded characters:
let my_string = "A";
To modify a string slice variable, it must be mutable:
let mut first_name = "Clerk";
println!("{}", first_name);
first_name = "Bruce";
println!("{}", first_name);
Tuples
Tuples are collections of values of different types grouped together. They are incredibly useful for returning multiple values from a function:
let hero = ("Bruce", "Wayne", 45 as u8);
println!("Hero: {:?}", hero);
let hero_first_name = hero.1;
println!("First name: {}", hero_first_name);
Notice the use of type coercion for the age (45 as u8) and the debug printing style ({:?}) to unpack and display the tuple.
Arrays
Arrays are collections of values of the same type, with a fixed size:
let hero_names: [&str; 3] = ["Bruce", "Diana", "Clerk"];
println!("Heroes: {:?}", hero_names);
Arrays provide safety and performance by storing elements contiguously in memory. However, their size must be known at compile time, and all elements must be of the same type.
Slicing Arrays
Slicing allows us to reference a contiguous sequence of elements in an array, effectively creating a "view" into the array without copying its contents:
let hero_ages: [i32; 5] = [45, 32, 55, 26, 42];
let first_four = &hero_ages[..4];
println!("{:?}", first_four);
This example demonstrates how to take a slice of the first four elements of hero_ages.
Functions
Functions in Rust are defined using the fn keyword, followed by the function name, parameters, and the return type. They encapsulate code blocks that perform specific tasks and can return values to the calling code. Rust's powerful type system extends to function signatures, ensuring type safety and clarity in function definitions and calls.
Defining and Calling a Simple Function
Consider the task of generating a full name from a first name and a last name. This is a perfect use case for a function: it takes input, processes it, and returns a result. Here's how we could implement this in Rust:
pub fn get_fullname(first: &str, last: &str) -> String {
    let full_name = format!("{0} {1}", first, last);
    full_name
}
In this example, get_fullname is a public function (pub) that takes two string slices (&str) as parameters: first and last. It returns a String object that represents the full name. The function body uses the format! macro to concatenate the first name and the last name with a space between them, storing the result in the full_name variable. Finally, full_name is returned to the caller.
Notice how the function specifies its return type with -> String. This explicit return type is a requirement for functions that return a value. In Rust, the last expression in a function body is implicitly returned, making explicit return statements unnecessary in many cases. This is why full_name is returned without the return keyword.
Understanding Ownership and Scoping
Rust enforces variable validity through scoping rules, ensuring that data is only accessible where it's supposed to be, thus preventing bugs and memory leaks.
pub fn scoping_ownership() {
    {
        let s = "hello world"; // s comes into scope
        // do stuff with s
    } // s goes out of scope and is no longer valid
}
Here, s is only valid within the braces that define its scope. Once the scope ends, s is no longer accessible, illustrating how Rust automatically cleans up and frees resources.
String Ownership and Mutation
Ownership rules in Rust prevent data races at compile time and manage heap data efficiently. The String type, unlike string literals, is mutable and stored on the heap.
pub fn string_ownership() {
    let mut my_str = String::from("Hello ");
    my_str.push_str("World");
    println!("{}", my_str);
}
Mutating a String by appending "World" demonstrates ownership in action. When a variable like my_str goes out of scope, Rust automatically calls drop to free the heap memory.
Copy Semantics in Rust
Rust differentiates between types that are Copy and those that are not, influencing how variables interact with ownership rules.
pub fn int_binding_varibles_ownership() {
    let x = 5;
    let y = x; // Here, y is a copy of x
}
Primitive types like integers implement the Copy trait, allowing for variable bindings to create a full copy of the data rather than transferring ownership.
Moving and Cloning
For types that do not implement the Copy trait, such as String, Rust enforces move semantics to ensure safe memory management.
pub fn str_binding_variable_ownership() {
    let first_str = String::from("Hello");
    let sec_str = first_str.clone(); // Creates a deep copy
    println!("Works: {}", sec_str);
}
Using clone creates a deep copy of String data, a necessary step when you need to retain the original value after assignment to a new variable.
Ownership and Functions
Ownership principles extend to function arguments and return values, enabling Rust to prevent memory leaks and dangling pointers.
pub fn ownership_and_functions() {
    let greet = String::from("Hello");
    takes_ownership(greet); // greet's ownership is moved

    let x = 10;
    makes_copy(x); // x is copied, not moved
    println!("Outside: {}", x);
}
Passing a String to a function transfers ownership, rendering it inaccessible post-call unless returned. Primitive types, however, are copied, not moved.
Mutable References
Rust allows mutable references to change data without taking ownership, governed by strict rules to ensure safety.
pub fn mutable_refs() {
    let mut greet = String::from("Hello ");
    mutate_str(&mut greet);
}
Mutable references, like &mut greet, permit data mutation while enforcing rules that prevent data races, such as the prohibition of having more than one mutable reference to a particular piece of data in a single scope.
In the realm of Rust, the concepts of references and borrowing are pivotal for memory safety without the overhead of garbage collection. These concepts allow Rust programs to access data without taking ownership of it, enabling multiple parts of your code to read or modify data while maintaining the integrity and safety guarantees Rust is known for. This section explores how references and borrowing facilitate these interactions, particularly in the context of Solana blockchain development, where performance and safety are paramount.
References to Data Without Ownership
References in Rust let you refer to some value without taking ownership of it. This is akin to looking at a book in a library without taking it home. You can read and use the book, but it remains in the library for others to access.
A Basic Reference Example
Let's look at a simple example that calculates the length of a String without taking ownership:
pub fn calculate_length() {
    let mystr = String::from("ChainDev");
    let str_len = find_len(&mystr);
    println!("The len of {} is {}", mystr, str_len);
}

fn find_len(some_str: &String) -> usize {
    some_str.len()
}
In this code, find_len takes a reference to a String (&String) instead of taking ownership. This way, mystr remains valid after find_len is called, and we can use it afterward. The ampersand (&) signifies that a reference is being passed.
Borrowing, Modifying Data Without Ownership
While references allow read-only access to data, Rust also provides a way to modify data through mutable references. This is known as borrowing. However, Rust enforces strict rules to ensure safety and concurrency:
You can have either one mutable reference or any number of immutable references to a particular piece of data in a particular scope, but not both.
References must always be valid.
Modifying a String: Mutable References
Consider a function that appends text to a string:
pub fn changing_parent() {
    let mut greet = String::from("Hello ");
    change_me(&mut greet);
}

fn change_me(some_str: &mut String) {
    some_str.push_str(" World");
}
Here, change_me accepts a mutable reference to a String (&mut String), allowing it to modify the original string. Note the mut keyword in both the variable declaration (let mut greet) and the reference (&mut greet). This is necessary to make both the variable and the reference mutable, adhering to Rust's safety rules.
Structs in Rust play a crucial role in organizing data into logical groups, making it easier to manage and use complex data structures in your programs. This is particularly useful in Solana development, where you often deal with users, transactions, and other data-centric operations. Structs allow you to define custom data types that encapsulate related properties and behaviors.
Defining and Using Structs
Rust's structs enable you to group related data fields together, forming a coherent unit. Let's explore how to define and use a User struct in a Rust program.
Defining a Struct
#[derive(Debug)]
pub struct User {
    active: bool,
    username: String,
    email: String,
    sign_in_count: u64,
}
Here, we define a User struct with four fields: active, username, email, and sign_in_count. The #[derive(Debug)] annotation allows us to print the struct for debugging purposes, showcasing Rust's flexibility in facilitating development.
Creating Instances
To utilize our User struct, we create instances of it and populate the fields with relevant data.
pub fn create_user() {
    let mut user_1 = User {
        username: String::from("Bruce"),
        active: true,
        email: String::from("bruce@wayne.com"),
        sign_in_count: 5,
    };
}
In this snippet, we create a mutable instance of User named user_1 and initialize each field with specific values. Making user_1 mutable allows us to later modify its fields.
Accessing and Modifying Fields
Fields of a struct instance can be accessed using the dot notation, and if the instance is mutable, fields can be modified as well.
let email = user_1.email;
user_1.active = false;
Here, we access the email field of user_1 and modify the active field.
Constructing Structs with Functions
For more complex or repetitive struct construction, you can use functions to encapsulate the creation logic.
fn build_a_user(username: String, email: String) -> User {
    User {
        username,
        email,
        active: true,
        sign_in_count: 1,
    }
}
This function, build_a_user, simplifies creating a new User by taking username and email as parameters and returning a new User instance with some default values for active and sign_in_count.
Struct implementations and methods in Rust provide a way to define behavior associated with a struct, turning it from a simple data container into a more powerful and encapsulated object. This feature is especially useful in blockchain applications developed with Solana, where encapsulating logic and data together maintains code organization and clarity.
Implementing Methods on Structs
Methods are defined within an impl block, allowing you to specify functions that are associated with a particular struct. These functions can read or modify the struct's data.
Defining a Struct with Methods
Consider a Rectangle struct that represents a geometric rectangle. We can define methods to calculate its area and modify its dimensions:
#[derive(Debug)]
struct Rectangle {
    width: u32,
    length: u32,
}

impl Rectangle {
    fn area(&self) -> u32 {
        self.length * self.width
    }

    fn change_len(&mut self) {
        self.length = 50;
    }
}
In this implementation:
The
areamethod calculates the area of the rectangle. It takes an immutable reference toself, indicating that it borrows theRectangleinstance without taking ownership. This allows us to read theRectangle's data without consuming it.The
change_lenmethod modifies the rectangle's length. It takes a mutable reference toself, allowing it to change the data within the struct. This method demonstrates how methods can alter the instance they belong to.
Using Struct Methods
Methods are called using the dot notation. This syntactic sugar allows you to call methods on a struct instance clearly and concisely:
pub fn create_rec() {
    let mut rect_1 = Rectangle {
        width: 15,
        length: 100,
    };

    let area = rect_1.area();
    println!("Area: {}", area);

    rect_1.change_len();
    println!("Rect 1: {:?}", rect_1);
}
In the create_rec function, we create an instance of Rectangle, calculate its area using the area method, and then modify its length with the change_len method. The use of mutable and immutable references (&mut self and &self) in method signatures controls how methods interact with the struct's data, ensuring safe access and modification patterns.
Introduction to Anchor
Anchor abstracts away the complexities of directly interacting with the Solana program library (SPL), offering developers a cleaner and more intuitive way to build decentralized applications (dApps). It leverages Rust's type safety and the expressiveness of its syntax to ensure that smart contracts are both secure and easy to write.
Why Use Anchor?
Simplified Development: Anchor provides a set of tools and libraries that simplify the process of writing Solana smart contracts, making it accessible to those who may not be deeply familiar with blockchain development.
Safety and Security: Built on Rust, Anchor inherits Rust's emphasis on safety and memory management, reducing the risk of vulnerabilities in smart contracts.
Rapid Testing and Deployment: With Anchor, developers can quickly test their programs in a local environment before deploying them to the Solana blockchain, ensuring a smooth development process.
Writing the program
To begin with Anchor, you'll typically start by setting up your development environment, and you can do this by following the official installation on the anchor documentation. However, for this tutorial, we will leverage the Solana Anchor playground, a web-based IDE that allows you to write, compile, and deploy Anchor programs without any local setup.
Using Solana Anchor Playground
The Solana Anchor playground is an excellent tool for newcomers and experienced developers alike, offering a hassle-free environment to experiment with Anchor projects. Here's how you can get started:
Access the Playground: Navigate to the Solana Anchor playground website. This web-based IDE is designed to provide you with a pre-configured environment for Anchor development.
Explore Sample Projects: The playground often comes with sample projects that you can review and modify. These samples provide a solid foundation for understanding how Anchor projects are structured and how they interact with the Solana blockchain.
Write Your Smart Contract: Start by writing your Anchor smart contract in the playground's code editor. Anchor's syntax and APIs are designed to be intuitive for those familiar with Rust, allowing you to define instructions, accounts, and data structures with ease.
Compile and Deploy: Use the playground's built-in tools to compile your Anchor program and deploy it to a simulated Solana blockchain environment. This step is crucial for testing the functionality and performance of your smart contract.
Interact with Your Contract: After deploying your contract, you can interact with it directly from the playground, simulating transactions and querying state to ensure that everything works as expected.
Understanding the Anchor Code Structure
Building on Solana with Anchor involves creating sophisticated smart contracts leveraging Rust's strong type system and Anchor's framework to simplify development. In the project tutorial, we build an exemplified smart contract for a hypothetical Heroes application, where you can create and update hero profiles. This section breaks down the key components of the code, providing insights into how to harness the power of Anchor for building robust Solana applications.
This complete Anchor program includes functionalities to create and update a hero's profile with attributes such as name, age, and bio.
Declaring the Program ID
declare_id!("4axWNQPo1BuJvCwS5yYf1AJ6sF3AeaH7fMGSHTMEUM5A");
Every Anchor program requires a unique program ID. This ID links your on-chain program to your off-chain code.
Take this as the address of the program, similar to that of ethereum.
The Main Module
#[program]
mod heroes {
    // Function implementations...
}
The #[program] attribute designates this module as containing the smart contract's entry points. We'll get to this later.
Defining the Hero Account
The Hero struct is at the heart of our application. It represents a hero profile with attributes such as name, age, bio, and more.
The Rust #[account] macro from Anchor is pivotal here, marking the struct as an on-chain account. This macro prepares Hero for serialization and storage in the Solana blockchain's account model.
#[account]
pub struct Hero {
    name: String,
    age: i32,
    bio: String,
    author: Pubkey,
    created_at: i64,
}
Each field within the Hero struct carries significant information about a hero, from the basic name and age to a bio that provides a deeper narrative. The author field, holding a Pubkey, denotes ownership and establishes a relationship between the hero profile and its creator. The created_at timestamp captures the moment of creation, offering chronological context.
The Concept of Rent on Solana
Solana charges rent for the storage of data on the blockchain to prevent the ledger from becoming bloated with inactive accounts. This rent is a fee calculated based on the size of the account and the current rent rate, which is determined by the network. Accounts that do not hold enough SOL to cover their rent for an extended period can be purged, ensuring that only active and funded accounts consume storage resources.
Calculating Rent
Rent on Solana is calculated based on the size of the account (in bytes) and the duration for which space is rented. The Solana documentation provides a rent calculator and formulas for developers to estimate the rent costs associated with their accounts.
The formula for calculating rent is essentially:
makefileCopy codeRent = Account Size in Bytes * Rent Rate
Every program is meant to pay some SOL in form of RENT for it's state on the Solana blockchain, to prevent the risk of removal. The most common way is deploy rent exempt programs. These are programs that are deployed with enough SOL rent to cover for over 2 years on chain. When this is done, the program is declared rent-exempt program.
The amount of SOL required to make program rent-exempt, is determined by calculating it's byte size before deploying as shown in the next section.
Account Size Calculation
Blockchain storage is not infinite, nor is it free. Each byte stored consumes resources, translating to costs for users and developers. This reality necessitates precise calculations of account sizes to ensure efficient and cost-effective storage.
Solana has a precise way of calculating
const DISCRIMINATOR_LENGTH: usize = 8;
const MAX_NAME_LENGTH: usize = 50 * 4; // maximum is 50
const AGE_LENGTH: usize = 4;
const MAX_BIO_LENGTH: usize = 240 * 4; // maximum is 240
const TIMESTAMP_LENGTH: usize = 8;
const AUTHOR_LENGTH: usize = 32;
Anchor requires a clear definition of how much space an account will occupy. This section meticulously outlines each component of the Hero account's size, from the discriminator (a unique identifier for Anchor to distinguish account types) to the maximum lengths of variable-sized fields like name and bio.
Implementing the Total Size
After detailing each component's size, we sum them to establish the Hero account's total size. This calculation ensures that the blockchain allocates enough space to store all necessary information without wasting resources.
impl Hero {
    const LEN: usize = DISCRIMINATOR_LENGTH
        + MAX_NAME_LENGTH
        + AGE_LENGTH
        + MAX_BIO_LENGTH
        + TIMESTAMP_LENGTH
        + AUTHOR_LENGTH;
}
This implementation block for Hero defines a constant LEN, representing the total bytes required to store a Hero account. It's a sum of all previously defined constants, carefully accounting for every piece of data the Hero struct will hold.
In this section of our Solana development series, we delve into the heart of account management and smart contract functionality on Solana using Anchor, a framework that simplifies Solana's Sealevel runtime. We will explore how to define the functionality for adding a hero to our decentralized application (dApp).
Understanding the CreateHero Struct
The CreateHero struct is crucial for creating new hero accounts within our dApp. It leverages Anchor's powerful macros and Solana's account model to securely and efficiently manage blockchain state.
#[derive(Accounts)]
pub struct CreateHero<'info> {
    #[account(init, payer=author, space=Hero::LEN )]
    pub hero: Account<'info, Hero>,
    #[account(mut)]
    pub author: Signer<'info>,
    pub system_program: Program<'info, System>,
}
Let's break down the key components:
#[derive(Accounts)]: This macro from Anchor prepares the struct for working with Solana accounts by implementing necessary traits. It signifies that theCreateHerostruct will define the accounts required by thecreate_heroinstruction.#[account(init, payer=author, space=Hero::LEN)]: This attribute specifies that theheroaccount is to be initialized. Theinitkeyword indicates creation of a new account. Thepayer=authorparameter specifies that the transaction's signer, who is the author, will pay the rent for this new account. Thespace=Hero::LENparameter allocates storage space for the hero account based on the calculated length (LEN) from theHerostruct, ensuring enough space is reserved for all the hero's data.pub hero: Account<'info, Hero>,: This line declares theheroaccount with the data type specified by theHerostruct. It represents the state of a hero in our dApp.#[account(mut)]: Themutkeyword marks theauthoraccount as mutable, meaning it can be modified during the execution of the instruction. This is necessary because creating a hero account will deduct the account creation cost from the author's balance.pub author: Signer<'info>,: This specifies the transaction's signer. In our dApp's context, the author is the user who initiates the transaction to create a new hero account.pub system_program: Program<'info, System>,: This line includes Solana'sSystemprogram in our instruction. TheSystemprogram is responsible for fundamental blockchain operations like creating accounts. By including it, we ensure that our instruction has the necessary permissions to interact with the blockchain at a low level.
The Role of CreateHero
The CreateHero struct serves as the blueprint for the create_hero function (not shown here). When a user calls this function, they must provide the necessary information (name, age, bio) and sign the transaction. Anchor and Solana's runtime use the definitions in CreateHero to validate the transaction, initialize the hero account with the provided data, and deduct the required SOL to cover the rent from the author's account.
This approach abstracts away the complexities of account management and Solana's low-level APIs, allowing developers to focus on the logic of their dApp. By leveraging structs like CreateHero and Anchor's macros, developers can define clear, secure, and efficient instructions for interacting with the blockchain.
This snippet is a critical part of our Solana dApp, where we define the create_hero function using Anchor, a framework that simplifies Solana smart contract development. This function is responsible for creating a new hero account with the provided attributes: name, age, and bio. Let's break down how it works and its significance.
Function Definition
pub fn create_hero(
    ctx: Context<CreateHero>,
    name: String,
    age: i32,
    bio: String,
) -> Result<()> {
    // Function body
}
ctx: Context<CreateHero>: This parameter is a context that holds the accounts needed for the execution of this function, as defined in theCreateHerostruct. It ensures that all necessary accounts are available and properly configured.name,age,bio: These parameters are the hero's attributes provided by the user. They will be stored in the newly created hero account.
Function Logic
Account References: The function first obtains mutable references to the
heroandauthoraccounts from the context. This allows modifying these accounts within the function.let hero = &mut ctx.accounts.hero; let author = &mut ctx.accounts.author;Timestamp: It retrieves the current timestamp from the blockchain's clock. This timestamp is used to record when the hero was created.
let clock = Clock::get().unwrap();Data Validation: Before creating the hero, the function validates the
nameandbiolengths to ensure they do not exceed predetermined limits. If any of these validations fail, the function returns an error, preventing the creation of the hero account with invalid data.if name.chars().count() > 50 { return Err(ErrorCode::NameTooLong.into()); } if bio.chars().count() > 240 { return Err(ErrorCode::BioTooLong.into()); }Creating the Hero: After passing the validation checks, the function populates the hero account with the provided data:
name,age,bio, theauthor's public key as the hero's creator, and the currenttimestampas the creation date.hero.name = name; hero.age = age; hero.bio = bio; hero.author = author.key(); hero.created_at = clock.unix_timestamp;Completion: Finally, the function returns
Ok(()), indicating successful execution.
Importance
This function exemplifies how smart contracts on Solana, written with Anchor, can perform complex operations such as account creation, data validation, and state management in a secure and efficient manner. By encapsulating these operations within a single function, Anchor provides a powerful abstraction that simplifies Solana smart contract development, making it more accessible to developers.
The use of Result<()> as the return type allows for robust error handling. By leveraging Rust's powerful type system and error handling capabilities, the function can gracefully handle failures, ensuring that invalid or malicious inputs do not compromise the dApp's integrity.
Overall, the create_hero function is a foundational piece of the dApp, enabling users to add new heroes to the program with verifiable attributes, while ensuring data integrity and security through meticulous validations.
The UpdateHero struct, annotated with #[derive(Accounts)], is pivotal for defining the accounts required by the update_hero function in our Solana smart contract. Let's dissect its components and understand its role within the contract.
The UpdateHero Account
To extend our program abit further, we may want to have a way of updating our heros in the program, and we can do this using the Update Hero struct.
The UpdateHero struct serves as a template for the accounts needed when updating a hero's information. By defining these requirements upfront, Anchor can automatically handle much of the boilerplate associated with account validation and deserialization, allowing developers to focus on the business logic of their program.
When a request to update a hero is made, the transaction must include the specific hero account to be updated and the signer's account. The constraints defined in UpdateHero ensure that:
The hero account is writable (
mut).The signer is the original creator of the hero account (
has_one = author), providing a secure way to manage updates.
This struct exemplifies how Anchor simplifies Solana smart contract development by abstracting away the complexities of account management and security, allowing developers to define clear, enforceable rules for how and by whom data can be modified.
#[derive(Accounts)]
pub struct UpdateHero<'info> {
#[account(mut, has_one = author)]
pub hero: Account<'info, Hero>,
pub author: Signer<'info>,
}
#[derive(Accounts)]is an Anchor attribute that auto-implements theAccountstrait for theUpdateHerostruct. This trait is crucial for validating and deserializing accounts passed into a Solana program.'infois a lifetime parameter, indicating that theUpdateHerostruct and its fields have a relationship to the lifetime of the transaction's execution context.
Fields
hero: Account<'info, Hero>: This field represents the hero account to be updated. TheAccount<'info, Hero>type specifies that this is an account holding aHerostruct.mutsignals that this account will be mutated, meaning theupdate_herofunction intends to modify the data stored in this hero account.has_one = authoris a constraint that enforces theauthorfield of theHeroaccount (the hero's creator) must match the public key of theauthorsigner in this transaction. This ensures only the original creator of a hero can update it, adding a layer of authorization and security.
author: Signer<'info>: This field represents the transaction's signer, who must be the author (creator) of the hero account being updated. TheSignertype indicates that this account is required to sign the transaction, providing the necessary authorization to make changes.
The UpdateHero Function
The update_hero function is a crucial part of our Solana smart contract, allowing for the modification of an existing hero's attributes. It leverages Rust's pattern matching and Option type to conditionally update the hero's name, age, and bio based on the provided inputs. Let's break down how it works:
pub fn update_hero(
ctx: Context<UpdateHero>,
name: Option<String>,
age: Option<i32>,
bio: Option<String>,
) -> Result<()> {
// Some("Jack") None
let hero = &mut ctx.accounts.hero;
if let Some(name) = name {
if name.chars().count() > 50 {
return Err(ErrorCode::NameTooLong.into());
}
hero.name = name;
}
if let Some(bio) = bio {
if bio.chars().count() > 240 {
return Err(ErrorCode::BioTooLong.into());
}
hero.bio = bio;
}
if let Some(age) = age {
hero.age = age;
}
Ok(())
}
ctx: Context<UpdateHero>: The context parameter is a container for the accounts involved in this operation.UpdateHerospecifies the account constraints and relationships required for the update operation, ensuring that only the hero's author can update the hero's details.name: Option<String>,age: Option<i32>,bio: Option<String>: These parameters are wrapped in Rust'sOptiontype, allowing them to be eitherSome(value)orNone. This design choice enables partial updates; clients can update any combination of a hero's name, age, and bio without needing to provide all three parameters.
Function Body
Conditional Updates: The function first checks if a new value has been provided for each of the hero's attributes (name, age, bio). It uses Rust's
if let Some(value) = optionsyntax to execute code blocks only if the optional parameters contain values.Validation: Before updating the hero's attributes, it validates the length of the name and bio to ensure they do not exceed predefined limits (50 characters for name, 240 characters for bio). If any attribute exceeds its limit, an error is returned, halting the update process.
Applying Updates: If the validations pass, the hero's attributes are updated with the new values provided.
Error Handling
The function uses custom error codes (ErrorCode::NameTooLong, ErrorCode::BioTooLong) to provide meaningful feedback in case of invalid input. These error codes are part of an enum defined elsewhere in the contract, leveraging Anchor's error handling mechanisms to communicate issues to the caller.
Full code
use anchor_lang::prelude::*;
// This is your program's public key and it will update
// automatically when you build the project.
declare_id!("4axWNQPo1BuJvCwS5yYf1AJ6sF3AeaH7fMGSHTMEUM5A");
#[program]
mod heroes {
use super::*;
pub fn create_hero(
ctx: Context<CreateHero>,
name: String,
age: i32,
bio: String,
) -> Result<()> {
 let hero = &mut ctx.accounts.hero;
 let author = &mut ctx.accounts.author;
let clock = Clock::get().unwrap();
// 🔐 Guard from invalid and too long data...
if name.chars().count() > 50 {
// throw an error
return Err(ErrorCode::NameTooLong.into());
}
if bio.chars().count() > 240 {
// Throw an error
return Err(ErrorCode::BioTooLong.into());
}
// Create the hero...
 hero.name = name;
 hero.age = age;
 hero.bio = bio;
 hero.author = author.key();
 hero.created_at = clock.unix_timestamp;
Ok(())
}
pub fn update_hero(
        ctx: Context<UpdateHero>,
        name: Option<String>,
        age: Option<i32>,
        bio: Option<String>,
    ) -> Result<()> {
        // Some("Jack") None
        let hero = &mut ctx.accounts.hero;

        if let Some(name) = name {
            if name.chars().count() > 50 {
                return Err(ErrorCode::NameTooLong.into());
            }
            hero.name = name;
        }

        if let Some(bio) = bio {
            if bio.chars().count() > 240 {
                return Err(ErrorCode::BioTooLong.into());
            }
            hero.bio = bio;
        }

        if let Some(age) = age {
            hero.age = age;
        }

        Ok(())
    }
}
// Result will return -> Ok(result) | Err(error)
// Funtionality -> Add a hero (Info: name, age, universe()) CRUD
// Create the Hero... (name, age, bio..)
#[derive(Accounts)]
pub struct CreateHero<'info> {
#[account(init, payer=author, space=Hero::LEN )]
pub hero: Account<'info, Hero>,
#[account(mut)]
pub author: Signer<'info>,
pub system_program: Program<'info, System>,
}
#[derive(Accounts)]
pub struct UpdateHero<'info> {
#[account(mut, has_one=author)]
pub hero: Account<'info, Hero>,
pub author: Signer<'info>,
}
// Hero Account info
#[account]
pub struct Hero {
name: String,
age: i32,
bio: String,
author: Pubkey,
created_at: i64,
}
// 2. Constants to calculate the size of Hero account
const DISCRIMINATOR_LENGTH: usize = 8;
const MAX_NAME_LENGTH: usize = 50 * 4; // maximum is 50
const AGE_LENGTH: usize = 4;
const MAX_BIO_LENGTH: usize = 240 * 4; // maximum is 240 * 4
const TIMESTAMP_LENGTH: usize = 8;
const AUTHOR_LENGTH: usize = 32;
// 3. Add a implementation to find the total size of the Hero Account
impl Hero {
const LEN: usize = DISCRIMINATOR_LENGTH
+ MAX_NAME_LENGTH
+ AGE_LENGTH
+ MAX_BIO_LENGTH
+ TIMESTAMP_LENGTH
+ AUTHOR_LENGTH;
}
#[error_code]
pub enum ErrorCode {
#[msg("The name MUST not exceed 50 characters")]
NameTooLong,
#[msg("You bio MUST not exceed 240 characters")]
BioTooLong,
}
// 1. handling state / State management (accounting system) ✅
// 2. CRUD functions | Changing state | Mutating (accounts)
// 3. Testing
// 4. Deploying
We've covered the most important pieces of the program, now we can compile and deploy and test the program.
Deploying the program
You need to have some test SOL to facilitate the deployment of the program. They’re several ways you can get test SOL in your account, but my most recommended way is to use the official Solana faucet. Paste in your address and airdrop some test SOL.
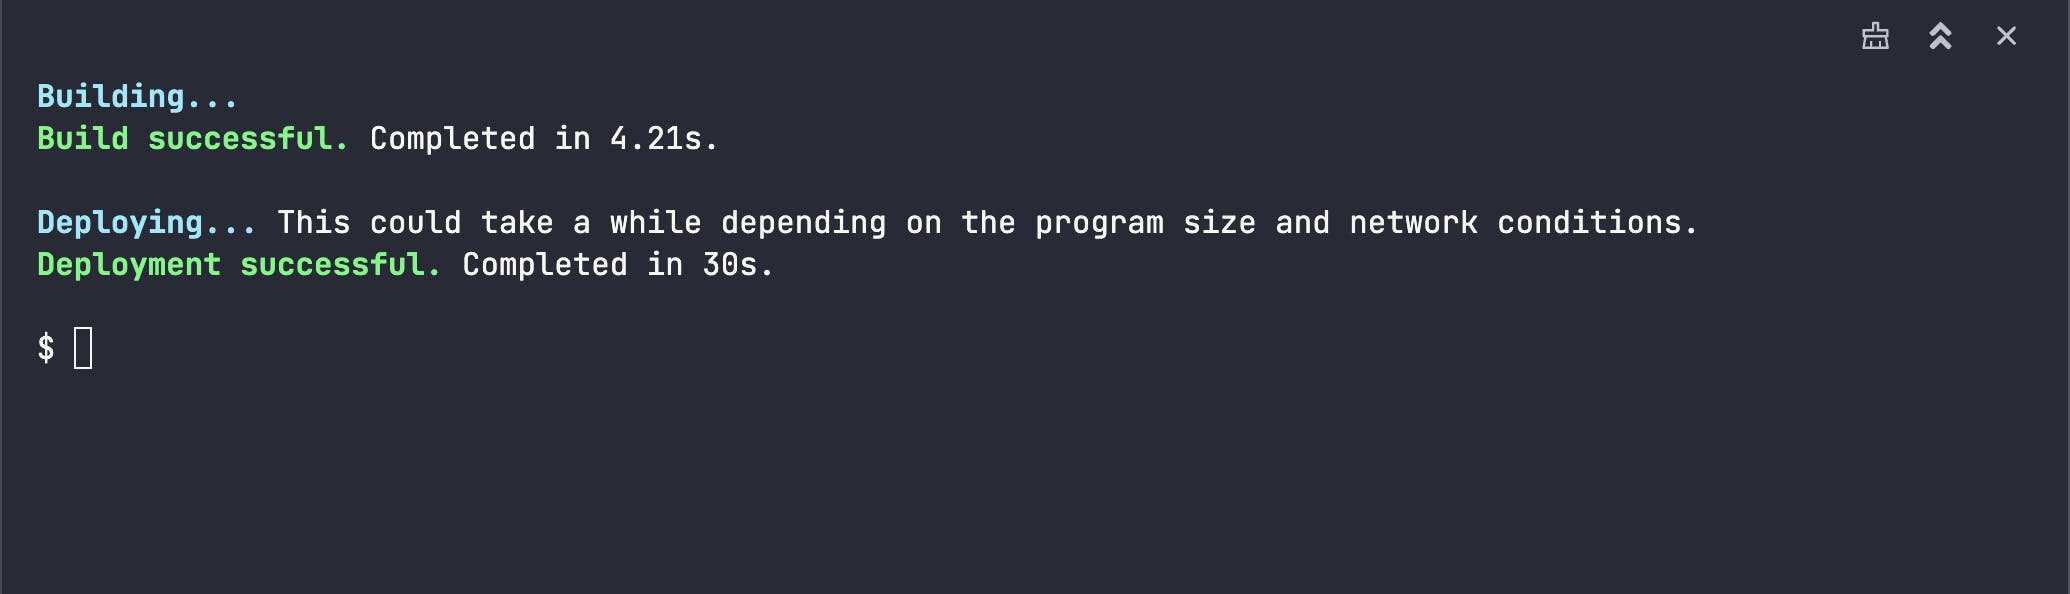
Now that you have some SOL in the address, we can deploy the contract using the build and deploy tabs on the left side of the playground as shown below.
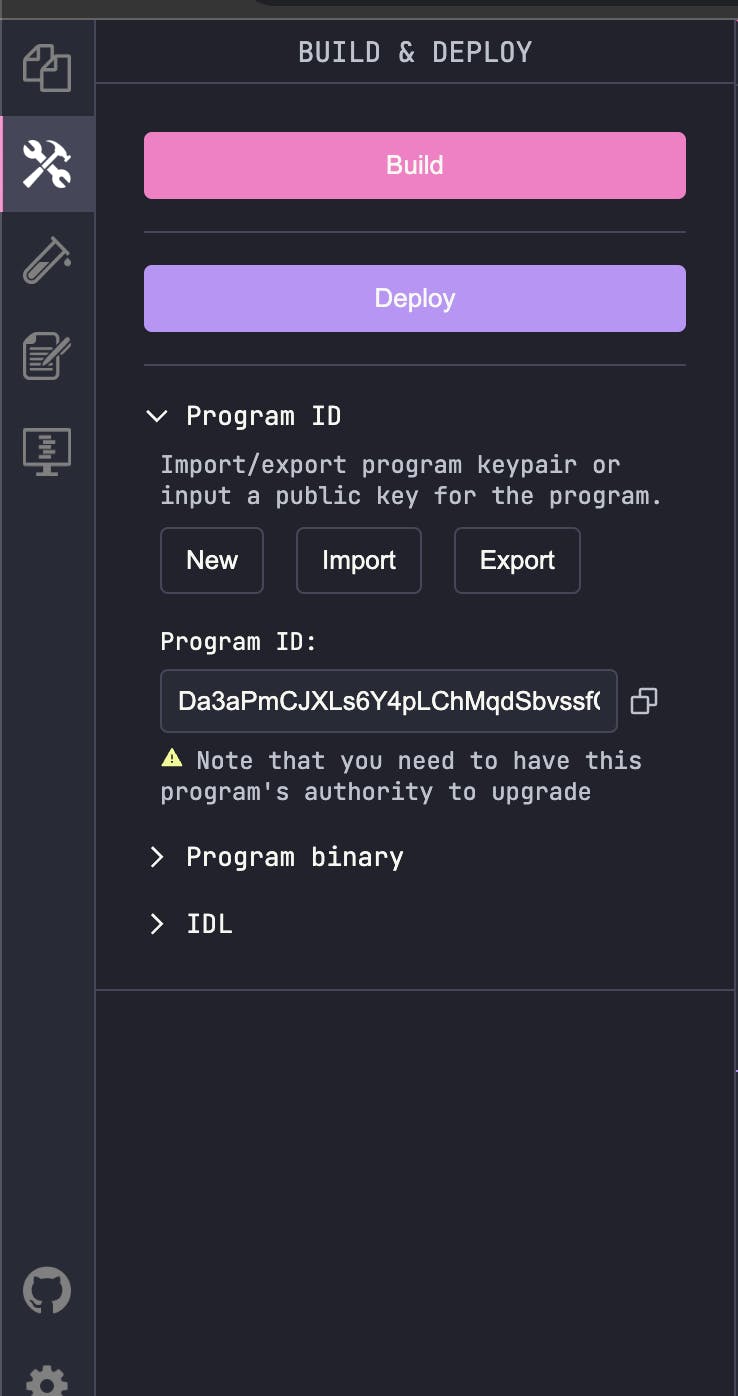
First, we build the the program and confirm we do not have any errors, then finally, we deploy using the deploy button.
Output:
Testing the program
Now that our program has been deployed to solana devnet, we can now interact with it. The solana playground provides inbuilt test instructions in the browser which can make it easier to test the functions of the program.
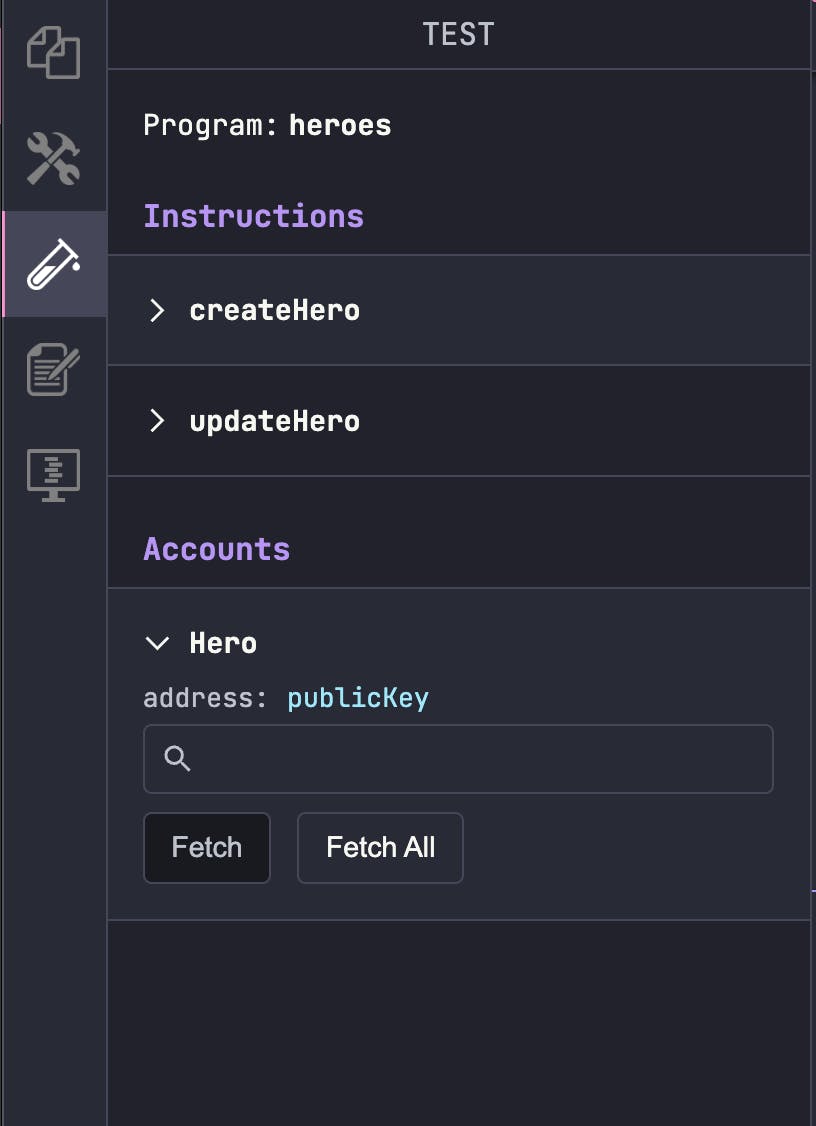
While this can be very easy to test out the program, the most common way is to write your own test using a library like chai, and this is what we're going to use.
The testing section of your Solana smart contract, specifically for a program managing hero data, demonstrates how to use JavaScript and the Anchor framework for writing unit tests. These tests ensure that your smart contract behaves as expected before deployment to a live environment. Let's break down the two test cases provided:
Testing Retrieval of All Heroes
This test checks whether querying all hero accounts from the deployed Solana program returns a non-empty list, specifically expecting three heroes. This is crucial for verifying that the program correctly stores and retrieves multiple accounts.
describe("Heroes", () => {
  it("Should get all heroes by not returning an empty list", async () => {
    const heroes = await pg.program.account.hero.all();
    const heroCount = heroes.length;

    assert(heroCount > 0, "No heroes were found here");
    assert.equal(heroCount, 3, "Heroes number did not match");
  });
describeanditFunctions: These come from the Mocha testing framework, organizing tests into suites and individual test cases.Retrieving All Heroes:
pg.program.account.hero.all()asynchronously fetches all hero accounts stored by the program.Assertions: Using Chai's
assertmethod, the test first checks if any heroes exist, then verifies the expected number of heroes is precisely three.
Testing Retrieval of Specific Hero Data
This test aims to fetch a specific hero, "Batman", by its public key and verify that the retrieved name matches the expected value.
  it("Should get Batmans data", async () => {
    const batmanData = {
      pubKey: "9UKyKvCMjLeVQ7qAqgYpA6P5Qn5BJkkEJfZWczVfUN5s",
      name: "Batman",
    };

    const hero = await pg.program.account.hero.fetch(batmanData.pubKey);

    assert.equal(batmanData.name, hero.name, "The hero did match");
  });
Fetching a Specific Hero:
pg.program.account.hero.fetch(batmanData.pubKey)asynchronously retrieves the hero account associated withbatmanData.pubKey.Assertion: Checks if the
nameproperty of the fetched hero matches "Batman".
Key Points
Global Availability: The test script mentions that no imports are needed because libraries such as
web3,anchor, andpgare globally available in the testing environment. This is typically set up by the Anchor framework's test configuration.Asynchronous Testing: Each test case uses
asyncfunctions to handle asynchronous calls to the blockchain, which is necessary for fetching account data.Testing Best Practices: These tests illustrate how to validate both the existence and specific attributes of blockchain-stored data, ensuring that your smart contract's data handling is accurate and reliable.
Output
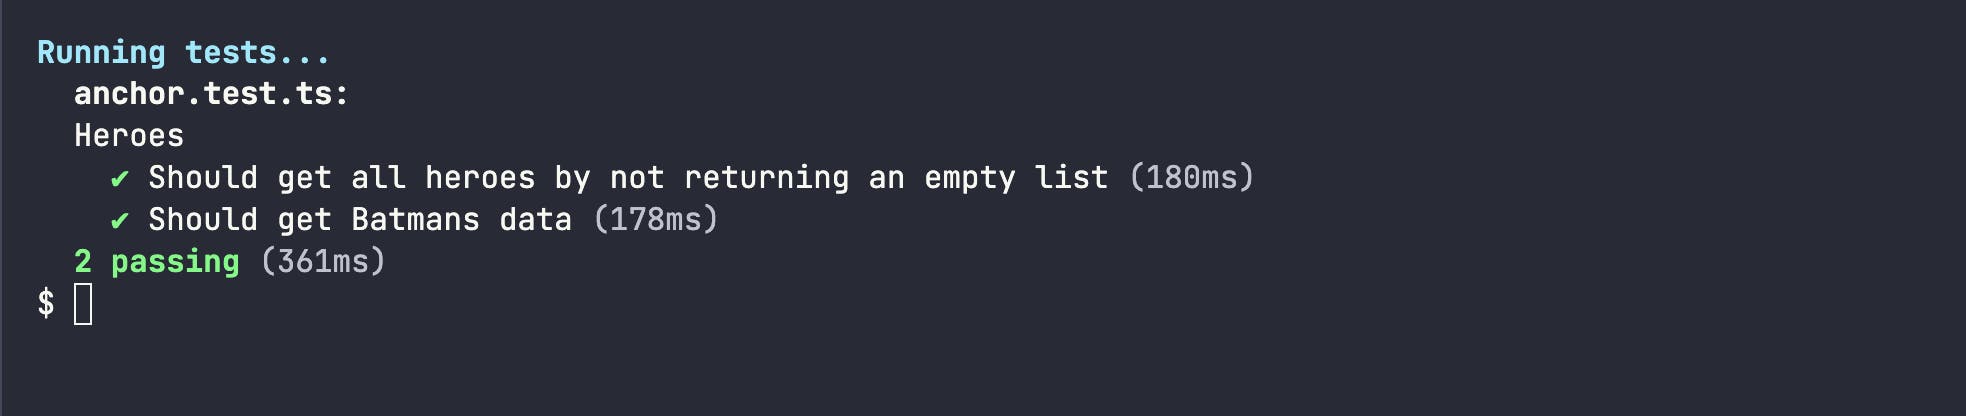
Writing and running these tests are crucial steps in the development process, ensuring your Solana smart contract works as intended and can handle expected inputs and states correctly.
Conclusion
Developing a Solana smart contract using Rust and the Anchor framework provides a robust and efficient way to build decentralized applications (dApps) on one of the fastest blockchain platforms available.
This article is based on the Build On Solana full tutorial series covered on decentracode youtube.